Showing posts with label kids. Show all posts

Saturday, January 4, 2014

UPDATE: Decluttering & Kids - Artwork

*Minimalist Reading - NO time to read this long post? Just read the bold parts and you'll get the summary version! You're welcome!

I previously posted about decluttering, kids and artwork. If you haven't read that post, you could take a look at it HERE. I'm not going to recap everything I covered but I am going to update a bit and maybe streamline the whole process in a more condensed form of 'instructions' on how to make this work for you.

Why an Update?

It's just past the holiday season for us - that means Thanksgiving, Christmas, and the New Year just wrapped up. Now the 5 and 6 year old are ....drum roll.... 6 and 7 years old! (Life is good!) but the art work has increased, not slowed down.

The girls have spent a solid 2 weeks off of school and now they are heading back (As in, this coming Monday!) so what should we do with our weekend but tackle 'The Beast' aka the Art Wall.

Previously, when I talked about managing the art work mess (because, really, that is what it is) I said that I was updating our scrapbook every week. Well...that fell flat quickly! Nobody has time for that!

I've settled for updating only during the girls' school breaks (or when the art wall gets CRAZY! but trust me...we just pile that art work on there if we can! One on top of another, over another, over another!)

I'm going to walk you through the actual step-by-step of what a ONE day digital scrapbook marathon looks like for me.

How often should you do this: Once or Twice a Year

Tools you will Need:

  • A Mixbook account (FREE) - Referral link ~ Thank you!
  • A Dropbox account (FREE) - Referral link ~ Thank you!
  • A Phone with the Dropbox app or a Camera with the ability to download your photos to your computer
  • A mountain of artwork that needs to be organized
  • If you are using your phone to upload your photos, make sure you are able to use WiFi to upload them or that you won't mess up your phone data plan by uploading a gazillion photos. Wifi = good.


Simplest Steps:

1) In your Free Dropbox account, set up the following file structure

Create a folder called 'Scrapbook' or 'Mixbook'
Inside that folder - Create the folder '2013' (or whatever year the photos were taken)
Inside the folder 2013: Create two folders 'Family' and 'Art'
Inside the folder 'Art': create one folder for each child. Only have one? Skip this step.
Do this for each year.

* Set up your phone to automatically upload your photos to Dropbox whenever it has access to your home/free Wifi. (Otherwise, you can easily go over your data limit)

2) Take photos of ALL the artwork that your child/ren brings home. I do this two or three times a year, not every week as I had said before. Weekly is just too much work.

3) Go through ALL photos after they have been uploaded to Dropbox and delete any that are blurry, out of focus, people are blinking, unflattering, or otherwise not something you would want in your scrapbook. Art work, you just make sure you don't have duplicates.

4) Delete ALL photos off of your phone/camera that you have uploaded to Dropbox.

5) When you have uploaded all of the family/art photos you are going to for the year, your folders are done/full!

6) Upload all the Family photos for the year into one mixbook (labeled correctly) and press 'Mix it' or lay it out manually in the way you want your scrapbook to look. Press save.

7) Upload all the Art photos for each child into separate mixbooks (labeled correctly) and press 'Mix it' or lay it out manually in the way you want your scrapbook to look. Press save.

You are done scrapbooking an entire year's worth of art/family photos in a matter of a few hours.

This is my process for scrapbooking. It's lazy, easy, and saves me a lot of time. I just 'mix' the artwork for the girls and don't bother laying them out. I *DO* put a photo of the girl on the cover of her art book, but that's it for customization.

Do you Print or do you Email?

Personally, I email links to family and friends. It has always been my intention to send these out as Christmas gifts but I never get around to it - because I'm lazy. One of these days, I might get around to it. But I think most people in our family prefer digital.

That's it! I've actually spent more time on this blog post than on doing the scrapbooks today. (I'm waiting patently as all 800 photos upload....*rolling beach ball* so...yeah. I hope this was helpful in tackling your artwork mess! Remember - Work Smarter, Digitally, not Harder!


Wednesday, July 17, 2013

Kids - A Lifetime of Quilting in a Few Hours: The Jelly Roll Quilt

If you have basic sewing skills you can be an awesome mom that quilts.

Hear me out!

I hear that it is hard to toss out all those cute little outfits. I hear people get hung up on separating with the memories those little outfits hold. And sometimes you want to hold on to them - but wow what a bunch of clutter that can develop!

I have a solution for you and it works for children of all ages (even grown ups!) - the Homemade Jelly Roll Quilt. To give you an idea of what I'm talking about, the 'jelly roll' quilt is a basic strip quilt. And that's really all it is. You take strips of fabric (all the same width and mostly the same length) and you sew them together. No matching, no planning really, very simple. Most people can do it in about a day. The HARDEST part is cutting the strips because
1) You need a lot of strips
2) They need to be the same size
3) Most people just buy the strips in a 'jelly roll' and so it's named the jelly roll quilt.


BUT what if you could take something that means a lot to you (the tiny clothes you don't want to part with) and embrace your procrastination in a way that WORKS for you? I assume you procrastinate because I do. ;D

Here is how it works. Get a box (Our girls have cute round hat boxes with their names inside) take clothes you KNOW are either too stained or worn, or you just hate to part with it - you know there are a few of them somewhere) but the kids are too big for and you wouldn't in a million years want to give it away. Okay. Now you need to turn it into one or more jelly roll strips.

"By definition, a Jelly Roll is a collection of 2 1/2" wide by 44" long fabric strips which come in a roll, usually with one strip from each print in a collection." - craftsy.com

Don't have small feet running around to give you an excuse to cut up and make a jelly roll quilt? Not to fear, craftsy.com has thoughts on that too - "One good way to build a supply of Jelly Roll strips is to cut a strip from every new fabric purchased." Great idea!

Just take the one or two or seven strips, however many you made from your new fabric or the clothes you've decided to preserve into a quilt, and stick them in your hat box (make sure they are labeled if you are working on more than one!) Tada! You're done! If you do it a little at a time, the hatbox will slowly fill. Just keep adding more strips as clothes are grown out of. When it starts to get crowded, just start to turn them into a 'jelly roll' to save space and keep on going!

When it is time all you need is a sewing machine with a basic straight stitch and a few free hours. I've heard of some people sitting down and sewing it all together in an hour or two. It's really very simple.

Now how awesome are you, Mom? You didn't hoard those mountains of clothes, you cut them up and made them into a beautiful quilt that you can give your teenager some day or keep for yourself when they have fluttered on out of the nest. Great for tshirts through highschool - you could end up with blankets for every room of any house they'll ever live in! And...it's not that hard!

The best tips I have to offer - Use a piece of cardboard as a template for all your jellyroll strips and keep it in the hatbox. This keeps them all the same. Try for the same materials if possible - all tshirt/jersey, etc. and last but not least - avoid a quilt of nothing but jean/denim - wow what a way to wear out a machine! lol

I hope this gave you some ideas, sparked some creativity and maybe helps you cut down on a little bit of small-children-clothing clutter. And the end result - recycle, reuse, reduce - Say hello to a quilt full of memories.

And remember - it's not cheating to just go out and buy a jellyroll to make a quilt! Nobody says you have to stash away strips over the years in order to end up with a beautiful quilt! But now you know how easy they are to make!

Final tip - Not a pro at backing? Me neither. Option one: Get a lightweight blanket and stitch it to the back of your quilt to 'finish' it - I say cheat all the way! Have the extra funds to spare? Contact a quilter - many will back your quilt as a service they provide. Easy peasy lemon squeezy!


Saturday, June 22, 2013

Kids - DIY Preplanned Craft Kits


I have sworn off my craft room. Every bead, every feather, every stamp block with a surfing dog on it, and all 400 of those skinny markers that never work and are always dried out. You are dead to me.

But girls must craft!

The Problem:

  • I never have a craft ready for the girls
  • When I try to craft with them, we are always missing pieces
  • My craft room was so messy I wouldn't go in for weeks unless forced to
  • Crafting made me cringe because it was/is a giant problem
What I DREAM about:
  • Telling the girls to go 'pick a craft' and have an instant craft already ready
  • Having instructions included so that if I'm not there, Daddy knows exactly what is needed and can read the instructions for every and any craft
  • If I'm not there, Daddy isn't taking stuff I need for another craft to do something with the girls
Moment of Inspiration:


$5 and Below store - They have those chintzy best friend bracelets and other strange kits all ready to go with extra pieces that give you nightmares about. And they are only about $5! Pretty sweet! I wish I could just buy 400 of these for the entire summer...*brain begins working*

The Solution:
  • I want to get rid of the Crafting mess (part of decluttering)
  • I want ready made craft kits with enough pieces for each girl to do one craft
  • I want instructions in with each craft so Daddy can pick a craft to do with the girls too!
  • PrePlanned craft boxes means Daddy won't be able to take stuff meant for other crafts - he won't need to!
  • No more stressing about finding a craft idea - we already did that!
  • Solution for Craft Kit Ideas - Amazon (whatever is selling) and Pinterest!
Possible Complications:
  • What to organize the craft kits in? - I don't want to go and buy 100 clear organizer boxes and stack them in my closet...Answer: Cereal Boxes turned inside out
  • What happens to any extra pieces? - I think we'll donate these to the teacher but over the summer they will be thrown out! Answer - Throw extra pieces out!
Random Observations - We eat a LOT of cereal in this house lately!

Now - How did we do?

I have decided to take a resource that we have a constant stream of - cereal boxes - and turn those into the Preplanned Craft Kit boxes. However - I think the outside is ugly. So I took apart the seams and turned it inside out and glued it back together with a hot glue gun. Very easy. See picture below (if I remembered to post it!)


How I am going to approach the Preplanned Craft Kits - I'm going to go into the craft room and pick something. Anything. And then look for what can be made, easily enough, with as few items as possible, with that one item. If we have everything for that craft idea then everything needed will go into the kit - enough for two, and I'll print out instructions for the kit.

*Tip* If you don't want to use cardboard boxes or cereal boxes - little zip lock baggies work just fine! (And you can see in them much easier). Entirely up to you! I am organizing my crafts by month - to be sure we're not doing Christmas crafts in July!

Now, how to label? You have to print out instructions so you might as well print out a picture of what the craft is supposed to LOOK like. Use some tape and tape it to the outside of your craft box. Kids love pictures!

How to keep up with them? Let your kids help you pick on Pinterest! Make a list of what you need for 5 or 10 projects that have very similar components (if possible) and go shopping for now many pieces you need. Just make it a craft shopping trip - we do it for groceries, don't we? Let them help choose, sort and store the kits! Which pictures go with which craft? Do you have all the pieces? Do you have a checklist? (in the instructions) Or do it when they are sleeping if the thought of sorting 10 craft kits with kids rummaging through everything you bought makes you panic - like me!

I hope that this has given you some ideas and inspiration! This idea takes a little bit of planning ahead of time but is a fantastic way to clear out your craft mess for good. Try a 'use it all up' before you buy anything for a 'new' craft project approach. Then you won't feel so bad about your new minimalist crafting approach. But be careful you don't lull back into "But we might need that some day...."!!!


Thursday, June 13, 2013

Kids & Cleaning - The Chore Flowers

We decided it was time for the girls to have chores. But we didn't want to start them on an allowance because we believe every person in the family needs to contribute to the family. These are called 'responsibilities'. But we still wanted to reward the girls if they go above and beyond.

What Problems Were We Facing?

  • I didn't want another chart on the wall
  • We were having problems with the girls picking their toys up
  • It needed to add to our decor, not clutter up the house
  • I needed the chore list/chart to be adaptable - adding and taking away chores
  • I needed to incorporate an Uh Oh box but again - no random slips of papers
  • I needed to add an incentive/reward type system that wasn't going to clutter the house up
These were many things to consider and I spent about two weeks looking online for a solution. I found many individual solutions but not really anything that would work together. I needed to minimize all the pieces and 'moving parts' that would lead to essentially more clutter and confusion.

I took several concepts and put them together or changed them.
First was the Uh-Oh box. This is something very cute that I found on Pinterest but I didn't like the slips of papers (could be lost, have to print them, would float around the house). 

Next, I wanted a Chore Chart. I found many clever ideas but nothing suitable. They all involved charts, lists, clipboards and such. But I didn't want more lists and charts. This stumped me. I came up with something all my own for this solution.

Last, but not least, I needed a reward system. Again, we didn't want to give an allowance. We wanted them to feel as though they are working toward something. I adapted the Uh-Oh box and mixed in a ticket punching system. 

All three of these things were incorporated into our Chore Chart solution which I ultimately came up with on a whim. They are "Chore Flowers". 

Why Chore Flowers?
  • I can tell what each flower is for - small purple filler flowers are uh-oh box chores, Big red glittery roses are Reward Box chores, Pink tulips were chosen by the 6 year old so those are all her daily chores and the red tulips were chosen by the 5 year old so those are all her daily chores.
  • These are placed in three vases. One vase per child and one vase for mommy (it holds the red roses and filler uh-oh flowers). 
  • These decorate the house while secretly holding chores. How? The bottom of the flowers are hotglued to Popsicle sticks. Each Popsicle stick has a chore written on it.
  • Anyone visiting just thinks the flowers are pretty, they don't realize they are chores!
  • This means getting rid of a chore chart, a reward chart, uh-oh box pieces of paper and adds a splash of color to the apartment which was much needed.

Reward and Uh-oh Chore flowers - Mommy's vase!

How I chose the chores:

Uh oh chores - these were chores that are not fun, slightly tedious, but don't take more than about 15 minutes. Examples: wiping down the walls downstairs, cleaning baseboards, cleaning and organizing the end tables in the living room, etc.

Reward Box chores - these were chores that make mommy's life a little easier. It is something I wish I didn't really have to do - like cleaning the toilet (I have a way to make this fun for kids!) or sweeping and mopping the kitchen (we use a kid-friendly Swiffer). There is another step to this though - each chore gets a hole punch in their ticket. (Getting to that)

Daily Chores - these are things that we ask the girls to do a lot. It all comes down to age. The basics are - shoes put away, books put away neatly, backpack put away, bed made, feed your fish, toys put away,  bathroom sink cleaned, laundry picked up and put away, reading one book a day, and they each have to do 15 minutes on ABCmouse.com which they love. So if you find yourself reminding your children to do something every day, make it a flower!

How this ties into the Uh-Oh box and the Reward box.

The Uh Oh Box - if Mom finds something out that should have been picked up, then it goes in the uh oh box. It is very simple - the girls do one purple flower chore (an uh oh chore) and they get one thing out of the uh-oh box. It's a 1 flower for 1 item exchange. Very simple. If Friday rolls around, the girls have to do enough uh-oh chores to get ALL the things out of the uh-oh box before their weekend begins. NO uh-oh chores can be done until ALL their daily chores have been completed. It's a rule.

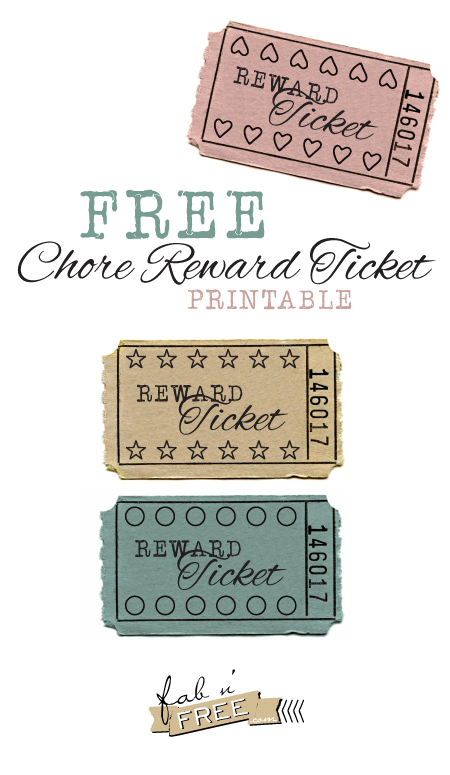
The Reward Box - for each red rose done, the girls get a hole punch in their Reward ticket. (They know where the reward tickets are kept so they can get a new one whenever it tickles them). The reward ticket has 12 places for punches (it's a lot but the prizes are pretty cool). After they get the ticket punched all the way (12 chores) they get to pick whatever they want out of the reward bucket. This is how the girls' earned their beta fish. Same rules apply - all daily chores must be done before any reward chores can be done.

What do we use for an Uh-oh Box and a Reward tub?
Target had plastic treasure chest tubs for $10-$20 and we got a red one which was perfect for our Reward tub. We use a CLEAR tub (very important so they can see what is inside without opening it) for our Uh-Oh tub and it has the standard little Uh-Oh rhyme on top.

What do we use for reward tickets? 
There is a great free printable that I found online that is perfect. Just print it off (color looks better! but black and white works) and if you don't have a hole punch and are going to get a new one anyway I suggest getting a FUN hole punch. I got one that punches little tiny hearts instead of circles. The girls love it!


Special thanks to Fabn'Free: Free Printable Chore  Reward Tickets


Where did I get the flowers? 
The dollar store. I let the girls pick out the flowers they wanted (I didn't tell them they were for chores) and once they picked ONE flower I got at least 12 of the exact same flower (about 3 bunches) for each girl. I spent about $20 on bunches of flowers and used a wire cutter to separate them into individual flowers. I used two popsicle sticks glued together to give height. Also - I got two plastic vases from the dollar store (matching) for the girls because they like to pick their vases up and move them around. When they get older, I'll switch to glass but for now - plastic all the way!

Where did the Uh-Oh box come from? 

Pinterst! Here is the source where you can find details about it, a list of potential Uh-Oh chores and the cute graphic to print for your own Uh-Oh box. The Uh-Oh Box Graphic.

I hope that this has sparked an idea! The chore flowers are still going strong in our house since February so... a good four months! We're getting ready to revamp our chore flowers to add more chores and get rid of chores that don't apply anymore. Wishing you the best. Love this?Share it, comment or ask questions below!


Declutter & Kids - Artwork

Artwork is big in our house. With a 5 year old and a 6 year old in the house we have more than enough artwork. The big question is - how to deal with it?!

There are a couple of things to look at before you get rid of it though.
1. It has emotional value
2. It's a gift from a child or something your child is proud of
3. Your child is still learning how to let things go

I am constantly reminding our girls that we keep memories, not necessarily stuff (though there are always exceptions). When we first began on our journey, the girls knew where the tape was and would place their artwork in any old place in the house. This made for an entire house full of crazy looking art.

Step One: Contain the Mess

My first move, before I started getting rid of ANYTHING was to centralize the mess to one spot and simultaneously setting up limitations that would have to be addressed. So I created the "Art Wall". This came about through a series of Martha Stewart (coincidence, it was a gift) ribbon, clothes pins, and a glue gun.


Here is the Art Wall!  It is very simple in design. (And this is all the end-of-school art that I'm behind on - I am doing it today which is why I'm posting about it) Every 6 inches or so I hot glued a clothes pin behind the ribbon. I turned the ends of the ribbon into bows and used little picture hanging nails to tack them up onto the wall.

How it is organized, because it is! The top ribbon is for Mommy and Daddy to pick something we really love and place it on the top row for all to see. The Middle ribbon is for the oldest and the Lowest ribbon is for the youngest - for height reasons.

The girls know when they get home from school to get all their art work (Not their school work usually unless it is an award of some kind) and put it on their ribbon. The clothespins mean they are easy to hang and can hang more than one thing.

Sometimes I don't get to the Art Wall for a week or two. Of course, I recommend keeping on top of things! But sometimes life just gets away from us and we forget about things like what we are supposed to be doing to keep from drowning in an overflowing wall of art.

Step Two: Organize and Declutter the Mess

Here is what I do with the artwork: I take photos of them.
My oldest is a bit of a hoarder. It can be small things that she collects in her pockets, every odd piece of wrapping on a gift or toy, or in this case every piece of art she ever made.

So we came up with a solution that works for everyone - Scrapbooking.
But it wouldn't be decluttering if we went the traditional route and it wouldn't be minimalist or time saving if we spent hours upon hours scrapbooking our childrens' artwork.

Here is my favorite way to do it:

1. At least once a week, take photos of ALL the artwork (on the wall - it's already hanging perfectly for you!) I use my phone (An iPhone 3s or something)
2. My phone has the Dropbox application (free) connected to a free Dropbox account and it syncs when I'm at home (uses our wifi which means it is not eating up my data/internet for my phone). My phone will automatically sync after I start taking photos.
3. Moving to my computer, I open up Dropbox and open up the photos in my personal favorite digital scrapbooking service (also free) - Mixbook

Really quickly - why is Mixbook my favorite?

  • If you make sure you take photos and pictures of art as they are created, Mixbook will 'shuffle' your photos into your scrapbook by date. You just press a magic "Mix it" (or something) button and it places all the photos in a template you choose. Instant Scrapbook for kids artwork.
  • You can share the book online for free - just add the emails of who you want to have access or send them a link. You can set your artwork book to 'public' as well. I only do this with artwork books that don't have our girls' photos because well some people are creepy.
  • You can view the book in very large size and good detail!
  • If family decide they love the book, they can order a book so long as they have a link! You don't have to send them one, they can choose to buy one without any help from you. If they choose to simply see the book online they can save the link and look at it whenever they get the urge (unless you delete it!)
  • You can send links to family and continue to work on your mixbook, adding stuff, changing stuff, etc. They can see it in almost real time after you save the book, they can see the changes.
  • You can order copies of your books and always have the originals/backups online in digital form. (Great in worries of floods, fires, or other disasters)
The only thing I don't like about Mixbook - and it's silly - is that you can't add video. But Video is currently my project this summer so stay tuned for that!

4. After all the pictures are uploaded to Mixbook I don't mess with the Mixbook at all. (It's a good idea to simply use the 'shuffle' button unless you want to be sucked into your Mixbook for ages). A word of caution - if you label your pages and pictures, you will lose all of that when you press 'shuffle'. Shuffle is really the way to go for artwork and an initial one-time 'shuffle' is the way to go with a real photo book - filling in details after the fact.

5. If you are scrapbooking photos and memories - it's a good idea to set aside 15 minutes a week to scrapbook these sorts of things. That means laying out the weeks photos, labeling them, adding little cute elements (Mixbook has a small collection - all free!)

Tips for Digital Scrapbooking
  • Your memory is endless - I mean your camera memory. Shoot as much as you want during memory making but make sure you spend a few minutes a day going through your downloaded photos and weeding out the photos that you wouldn't print out and send to family. If someone is blinking, if there is a photo bomb by a cat, if someone is bending over, you get the idea. It's hard to weed out photos AFTER they are uploaded to Mixbook so make sure you do it before you press 'Upload'
  • Even once your photos are uploaded to Mixbook, you should keep copies safe online in a secure storage place. I move mine to a sort of photo archive folder within Dropbox so I know that I have added them to Mixbook but if anything happens, I have them in a safe place (organized by date (year /month) and child). 
  • If you decide to really get into digital scrapbooking you can purchase scrapbooking elements and upload them into your Mixbook and place them on pages! It can be a lot of fun but remember that digital organization of digital scrapbook elements can get out of hand just like hands-on scrapbooking so word of caution!
Now the final step - letting go of the clutter.

6. Once the girls' artwork is uploaded, I let them SEE it. They get to flip through the digital pages and see their artwork. As they find it - they decide if they want to keep their art on the art wall for another week, or if they want to throw it away. You will be VERY surprised how excited children will be to see their artwork in a BOOK and if you explain that it is a FOREVER book, they will let go of a majority of their artwork. Not all - which is good, the art wall shouldn't be empty.  But just like we tell our girls "Now we can make room for MORE arts and crafts, right?" and they start getting rid of what is in the way for more arts and crafts!


7. Let the children throw it out - this gives them the power over their gift/their creation and teaches them about memories versus things. It gives them POWER over things and in a world where things mean more to some than people, this is an important thing to learn.

I hope you have loved this digital minimalist scrapbook idea!


Disclaimer - I get a referral bonus if you click on the Mixbook or Dropbox links. This means discounts on printed Mixbooks and additional free storage space on Dropbox. If you use my referral links - Thank you!